The new tab of Google Chrome always bothers me because I don't need a search bar on a blank page since the location bar has the same function. I've written one article about how to change it back but, unfortunately, the way I wrote isn't available anymore.
Now, there's a much easier method to do so.
Showing posts with label howto. Show all posts
Showing posts with label howto. Show all posts
Friday, April 17, 2015


Find my phone for Android
Is there anytime that you forgot where you've put your phone?
I believe some people, including me, have this problem once in a while. We may have left the phone in the office, or it's just buried under a pile of clothes. For Android users, there is now a easy way to find your phone.
I believe some people, including me, have this problem once in a while. We may have left the phone in the office, or it's just buried under a pile of clothes. For Android users, there is now a easy way to find your phone.
Sunday, July 28, 2013
Go back to the old new tab page of Google Chrome
NOTE:
This method isn't available anymore. Try the new way to do so.
I usually use Firefox as my default browser, but I use Google Chrome mainly for Google services like Gmail and Google drive. Therefore, I feel convenience that many online applications can be shown as an app icon in the new tab page of Google Chrome.


This method isn't available anymore. Try the new way to do so.
I usually use Firefox as my default browser, but I use Google Chrome mainly for Google services like Gmail and Google drive. Therefore, I feel convenience that many online applications can be shown as an app icon in the new tab page of Google Chrome.

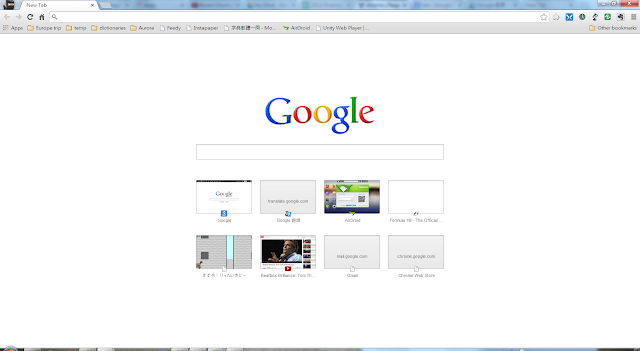
Unfortunately, after I've updated Google Chrome to version 29, the new tab page is changed. We could find a search bar in the middle of the page and few recently viewed sites showing below. Notably, the shortcut of applications is gone, instead, an app bookmark is shown on the bookmark tool bar, which links to a page (chrome://apps) that shows the applications we've installed just like the old new tab page.

Some people may feel okay because they don't have many applications and it seems to integrate with Google Now (I don't see Google Now running on my computer, and I don't know why) which could be very useful. However, for me, I prefer the old one. So that's what I do to get my old new tab page back!

- Enter "chrome://flags/" in location bar of Google Chrome
- Press "F3" or "Ctrl + F" to search "Enable Instant Extended API "
- Disable the option and click "Relaunch Now" button
Finally, we can get our new tab page back!

Saturday, April 13, 2013
Tune thouchpad for Linux Mint

The simplest way, which found on the google, is to create a script:
Save it and run it every time start up desktop.synclient TapButton2=2 synclient TapButton3=3
Or you can modify/usr/share/X11/xorg.conf.d/50-synaptics.conf:
Section "InputClass"
    Identifier "touchpad catchall"
    MatchIsTouchpad "on"
    MatchDevicePath "/dev/input/event*"
    Driver "synaptics"
    Option "VertTwoFingerScroll" "on"
    Option "HorizTwoFingerScroll" "on"
    Option "CircularScrolling" "off"
    Option "CricularTrigger" "0"
    Option "TapButton1" "1"
    Option "TapButton2" "2"
    Option "TapButton3" "3"
EndSection
I'm lazy to do that.
Friday, April 12, 2013
Install Linux Mint 14 on USB Drive
First of all, download Virtualbox, and a Virtualbox extension package is also needed to make USB work. Download the latest Linux Mint iso file. After those files are downloaded and installed completely, toggle enable USB 2.0 in Virtualbox >settings >USB and mount the iso file in the Virtualbox. Then we are ready to begin.

Boot the virtual machine with CD of Linux Mint, mount USB drive and click install.

The most important thing is here, choose your USB driver instead of hard drive to install, and remember to install the MBR on the USB drive as well.


The rest of steps are the same with installing linux on hard drive. After the installation finished, it's time to test the USB drive.
Notably, there is no way to boot virtual machine with USB devices directly, but we can make the USB device as a virtual hard drive, then we can boot from the USB drive. So here is what we going to do next. Go to Virtualbox installed folder in Command mode, and type the command:
VBoxManage internalcommands createrawvmdk -filename D:\VirtualBox\usb.vmdk -rawdisk \\.\PhysicalDrive4
Where "D:\VirtualBox\usb.vmdk" stands for your virtual disk location, and "PhysicalDrive4" stands for your USB drive (The number might be different in different computer).
Then, create another virtual machine with usb.vmdk, and it's done!
Here is the screenshot of my desktop after tuned:

NOTE:
The most worst thing of Linux Mint is that it doesn't install input method in default so we need to install it by ourself if we need one. Go to command line and install ibus.
sudo apt-get install ibus
Friday, July 20, 2012
Synchronizing Firefox

Months ago, I bought my first smart phone, Xperia pro. I start to use phone surfing websites. The biggest problem is the bookmarks on desktop were not available when I'm using phone. I did a little search on Google and it showed nothing about it until Chrome and Firefox for Android launched. I love these two browsers. I use Firefox the most, but I still use chrome a lot. These two browsers can both help me get my bookmarks on my phone because the bookmarks are exactly the same between Firefox and Chrome thanks to Xmarks. I tried Chrome at first because I'm a huge Google fan, but Chrome is too large. The phone kept showing "low space" which is really annoying. That's why I turn to Firefox.
Synchronization of Firefox is not the same with Chrome. Chrome synchronizes with Google account, but Firefox uses "pair devices" instead of account. The next following is showing how to synchronize Firefox between phone and desktop.


2. Launch Firefox on your computer and go to "Option" and "Sync". Select "Pair a device" and then you'll see three input boxes.

3. Entering the code on phone and press Next, and your Firefox is synchronizing.

4. Finally, you can see the successful connection on both phone and desktop.


Thursday, November 17, 2011
Using "I'm feeling lucky" as default search engine in Firefox
Firefox is an open source web browser. According to StatCounter Global Stats, the global usage share of Firefox was 26.39% in October 2011. I think most people feel familiar about this software. For me, I am a fan of Firefox, and I have been using it as my default browser since Firefox 2. The most important advantage of Firefox is the variability. Firefox contains a lot of add-ons that improve the using experience, and many settings are variable for users.
The location bar is also a search bar. It can search for history, bookmark, even on web. However, a search box is next to the location bar. I think that the function of search bar is too similar with the location bar so I make a little change of the location bar. The default search engine of the location bar is google, and I changed it to "I'm feeling lucky", and I strongly suggest you to change.
Why should you change the search engine to "I'm feeling lucky"?
"I'm feeling lucky" is a service of google, it suggest one most possible website that you may want to visit when you search a keyword. It makes lots of convenience on searching websites. For example, if I want to visit "www.facebook.com", what I need to do is search "facebook" in the location bar, and then, it will automatically connect to facebook website. Mostly, "I'm feeling lucky" can direct us to the right website. This can save us a lot of time.
How do I change the default search engine to "I'm feeling lucky"?
1. Launch Firefox, first.

2. Type "about:config" in the location bar. Then the browser will ask your permission to change the settings. Click "I'll be careful, I promise!", of course.

3. Then, search "keyword.url" in the filter, and double click the "keyword.url" in below.

4. After that, enter this URL, and click OK.

5. Finally, you have the smartest location bar in Firefox.
The location bar is also a search bar. It can search for history, bookmark, even on web. However, a search box is next to the location bar. I think that the function of search bar is too similar with the location bar so I make a little change of the location bar. The default search engine of the location bar is google, and I changed it to "I'm feeling lucky", and I strongly suggest you to change.
Why should you change the search engine to "I'm feeling lucky"?
"I'm feeling lucky" is a service of google, it suggest one most possible website that you may want to visit when you search a keyword. It makes lots of convenience on searching websites. For example, if I want to visit "www.facebook.com", what I need to do is search "facebook" in the location bar, and then, it will automatically connect to facebook website. Mostly, "I'm feeling lucky" can direct us to the right website. This can save us a lot of time.
How do I change the default search engine to "I'm feeling lucky"?
1. Launch Firefox, first.

2. Type "about:config" in the location bar. Then the browser will ask your permission to change the settings. Click "I'll be careful, I promise!", of course.

3. Then, search "keyword.url" in the filter, and double click the "keyword.url" in below.

4. After that, enter this URL, and click OK.
http://www.google.com/search?btnI&q=
5. Finally, you have the smartest location bar in Firefox.
Sunday, February 13, 2011
Configure the proxy server of google chrome independently

I think many people need to use proxy server form time to time, and it's not bothering to set proxy server once in a while, even though there are different ways in different browsers. Browsers like firefox or opera have indepedent proxy server settings which means that the proxy server we set is limited to the specific browser.
Unfortunately, when we try to congifure the proxy server of google chrome, we will find that google chrome uses the same proxy server setting with IE. In fact, that is not a big deal if we don't need to change proxy setting very often. However, what if we need to use different proxy settings for different websites? Wow, that would be very troublesome! The easy solution is that we can use firefox for A proxy setting, and opera for B setting, and IE for C setting. Well, this solution is good, but not good enough. Here, I'm going to tell a easiest way to solve the problem.
What we need is google chrome. Wait! Did I just say google chrome uses the same proxy setting with IE? Yes, definitely yes, but it didn't mean that google chrome can't use its own proxy setting. This function is hidden. To do this, we have to set up a shortcut in the desktop first, and then set the target of the shortcut. Just add:
--proxy-server=proxy server:portFor example, if the proxy server is 1.2.3.4, and the port is 8080, and what I have to do is add "--proxy-server=1.2.3.4:8080" in the end of the target.

After we do so, we will use the 1.2.3.4 proxy sever every time we start up chrome with this shortcut. Is that amazing? I think it is. So, if we use different proxy servers for different websites, we can just set different shortcut for specific website.
Still, good is never good enough. This method only solves the problem of changing different proxy settings every time, but we aren't able to use different proxy servers at the same time. That is a little pity.
UPDATE:
There is an easier way to use independent proxy in chrome. Install this extension called "proxy switchy" on google chrome. It can help us switch proxy easily during surfing on the internet with chrome. Honestly, I haven't tried it. This method was provide by anonymous in the comment. Thank you, whoever you are.
Saturday, February 05, 2011
Install rmvb codec for kmplayer

Kmplayer is a media player from korea. It contains many video codec but rmvb. Therefore, we have to install it by ourself.
First, download and install kmplayer from the official website.
Then, download and install the rmvb codec.
Extract the files and copy the four .dll files to the path of C:\program files(x86)\The Kmplayer which is the default installed path of Kmplayer.
Congratulation! It's done. Enjoy the movie!
Tuesday, October 26, 2010
Backup files automatically!
As I mention before, we should backup our files frequently. You may ask how frequently should we do? There is no standard answer for this question, honestly. It depends on how often we use computers. Take me as an example, I am postgraduate now, I have many important files every day, so I backup important files every day, and backup less important files once a month. The followings are some method I used to backup my files.
Dropbox
http://www.dropbox.com/
Dropbox is a web storage space which provides 2GB after we register an account. We can earn more spaces by inviting friends signing up in this website. The maximum space we can use free is 8GB. This website also provides a synchronized software. After we installing this software, there will be a new folder named "my dropbox" in the "my document" folder. When we put files in "my dropbox" folder, the files we put will be uploaded to web immediately. Last but not least, we can install this software in many computers of ours even in iphone or android phone, and then all files we put in "my dropbox" folder can be accessed in these devices. Therefore, if one of our computer is broken, we can still use the synchronized files from other devices or from the website directly.
There is an official video of introducing dropbox:
If you are interested in dropbox, and want to give it a try. Then sign up with this link:http://www.dropbox.com/referrals/NTMxOTk3MjI5, and you will get extra 250MB after you register an account.
Windows batch files and a 500GB external hard drive
Dropbox is a very ideal tool to backup our files, but unfortunately, there is only 2GB for us to use. That is not enough for me, so I bought a 500GB external hard drive to backup some files which is less important. My less important files are the files which I don't use very often such as the projects I have done, or the photos I took. I would backup these files in the external hard disk. However, these files are not in the same folder, so it would be very troublesome if I copy and paste these files manually, and plus, these files are really large. Therefore, I use 7zip and write a batch file with xcopy command and 7zip command to backup my files automatically.
Here is my batch files:
@echo off
@echo Backup Files
@echo.
@echo The following files will be backup:
@echo d:\software
@echo d:\chw
@echo d:\research tools
@echo.
@echo.
@pause
cls
@echo Backing up files please wait................
@echo.
@echo.
rem set date value
@For /f "tokens=1-3 delims=/ " %%a in ('date /t') do (set date=%%a-%%b-%%c)
rem @echo date is %date%
@echo Copying software files
xcopy d:\software d:\backup\"backup files"\backup-%date%\software /e /i /h /q
@echo.
@echo.
@echo Copying chw files
xcopy d:\chw d:\backup\"backup files"\backup-%date%\chw /e /i /h /q
@echo.
@echo.
@echo Copying research tools files
xcopy d:\"research tools" d:\backup\"backup files"\backup-%date%\"research tools" /e /i /h /q
@echo.
@echo.
@echo Creating log file in backup-%date%
cd d:\backup\"backup files"\backup-%date%\
@echo ==================================================== > "backup log".txt
@echo Files location: >> "backup log".txt
@echo ==================================================== >> "backup log".txt
@echo software d:\software >> "backup log".txt
@echo chw d:\chw >> "backup log".txt
@echo research tools d:\ research tools >> "backup log".txt
@echo. >> "backup log".txt
@echo. >> "backup log".txt
@echo ==================================================== >> "backup log".txt
@echo Files informations: >> "backup log".txt
@echo ==================================================== >> "backup log".txt
dir d:\software /a >> "backup log".txt
@echo ------------- >> "backup log".txt
dir d:\chw /a >> "backup log".txt
@echo ------------- >> "backup log".txt
dir d:\"research tools" /a >> "backup log".txt
@echo. >> "backup log".txt
@echo. >> "backup log".txt
@echo ==================================================== >> "backup log".txt
@echo These files were backup on %date% >> "backup log".txt
@echo ==================================================== >> "backup log".txt
@echo Log file has been created
@echo.
@echo.
rem compress files to 7-zip
cd d:\backup\
7za a -scsUTF-8 -mx=9 d:\backup\"backup files"\backup-%date%.7z d:\backup\"backup files"\backup-%date%\
@echo.
@echo.
@echo done!
@echo Files has been backuped in d:\backup\backup files\backup-%date%.7z
@echo.
@echo.
@pause
rem delete the folders
del /S /Q d:\backup\"backup files"\backup-%date%\
rd /S /Q d:\backup\"backup files"\backup-%date%\
I have to say it is not easy for me to write this file. I spent two hours finishing this files. If you want to try this method, you should download 7-Zip Command Line Version, and refer to the xcopy read me file. Other commands I used are echo, del and rd in the batch file. You can learn how to write a batch file in here, or just google it. I am sorry that I don't know how to write because I am not familiar with batch files, and I finished this batch files with google. Wish you enjoy it!
PS.
This is my first time to write a how to article. I hope all of you can know what I was writing.
Subscribe to:
Posts (Atom)